Friday 27 November 2009

Using your SharePoint/Tulip blog like you wish you could... or can do on Blogspot...

The aim of this tutorial is to give you a brief overview of how to use Tulips blogging tool and how to make it at least behave like a real blog should.


Hopefully once you’ve completed this tutorial you’ll be able to:

  • Find your blog
  • Create a Blog Post
  • Edit your post
  • Add images to your post
  • Delete a blog post
  • Re-finding your deleted blog post
  • Create category’s
  • Save as Draft and other such delights

When Microsoft created SharePoint they’d heard of the concept of Blogs but hadn’t actually used one! This is a tad frustrating for those of us who have used alternatives and for subjects of a non confidential nature I’d suggest using Blogspot or similar, however things where confidentiality is a high priority I’d suggest keeping them within the warm walls of a VLE. This way if you were to accidently say, I saw [insert name here] in the surgery today the damage is going to be limited. It also means you get to read my amazing tutorials!

This tutorial is aimed at University of Plymouth students on the Integrated Practice SCW539 module however it can be applied to anyone using the blog tool on SharePoint.

Let’s find your blog!

Having looked at all your blogs it’s obvious the majority of you have managed to find your correct blog however for those of you who haven’t looked yet are looking so hard you’ve magically made it disappear your blogs can be found on your “Integrated Practice II” module site.

Within this page I’ve created a list of all your blogs so not only can you find your own but you can also spy on your fellow comrades blogs. This list can be found on the left hand menu under sub heading “Lists” and titled “Blogs”.

This’ll bring up a list of names one of which should be your own....

Create a Blog Post

Let’s go to the main page of your blog, for this example I shall be using Tara Alexander’s blog, (I haven’t asked for Tara’s permission so shhh!!). On the right of the main page you should see a title of “Admin Links” one of the bullet points underneath should say “Create a post”, click this.


We are then taken through to the Post: New Item page, this will display in two different ways depending upon which browser you are using. If you are using Internet explorer it should display like this:


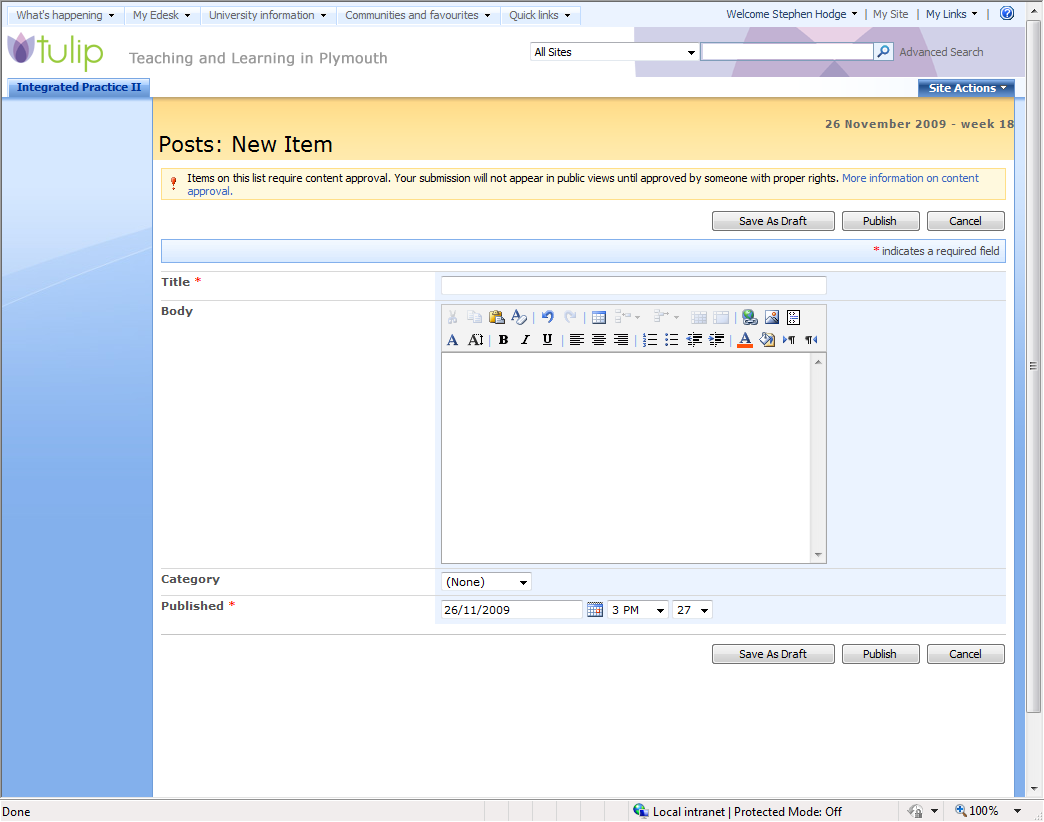
Or if you’re using any other browser like this:


Here we see the Microsoft Monopoly in full force, i.e. if your using internet explorer you get better functionality than if you use its competition bah! So I’d suggest using Internet Explorer for your blog if you can. Since this enables you access to the format pallet. However if you’re using a Mac, Linux or are just plan stubborn I shall give you some help on simple formatting.

Anyway for simple tasks this page should be quite self explanatory, so go ahead and type anything in there. Before you submit, take some time to appreciate the “Category” and “Published” sections. This can be quite useful if you want to spoof when your posts are made or if your posting about something in the past. The Category section is a useful thing to get into using since it’ll allow you to organise your posts and filter them via Category, for example if you were blogging about animals and created a separate Category for Cats and one for Dogs you could filter by Dogs and just list all your Dog posts....


Once your happy with what you’ve done here press the “Publish” button, you can press the “Save as Draft” button but we will cover this in another section.

Well-done you have made your first blog post! The internet can occasionally be quite flaky sometimes bad things happen to blog posts when you press the send button I suggest prior to posting you save all what you’ve written into a Word document, just to be on the save side, it’ll also spell check it for you!

Edit your Post

Right so I have posted a next to useless post onto Tara’s blog, let’s make it say something a little bit more useful! First lets go back to the home page of your blog. Under the Admin Links (where we found create post) there should be a link titled “Manage Posts”:


Click this. You should then see a list of your blog posts. If you hover your mouse over the blog post your wishing to edit a orange highlighting box should appear around the title followed with a small box to the right with an arrow left click this arrow and a sub menu should appear:


From this sub menu select “Edit Item”.

You will then be brought back to the Post edit screen we saw from the earlier step... magic!

Adding Images to your Post

Adding images to your posts... well this is the money post. The two warm up acts have exited the stage left and the crowed is cheering for the headliners to come on stage... adding images on to your Tulip blog is a simple dance move... the “Two Step”.

  • upload your image
  • attach said image to your post

Step1 – Uploading your image

  • If you go to your blog you should see a link on the left of the page titled “Photos” click on this.
  • Once in this page along the top bar there should be a link titled “Upload”, click this.
  • It should bring up a simple upload screen (much like on facebook, Flickr etc). Click on browse and find the image you wish to upload, once you’ve found it click “Open”.
  • The once empty box next to the Browse button should now be full of text as shown below. Before we click on, you should note the “Overwrite Existing files” tick box, this simply means it’ll overwrite any images with the same file name... this can be both useful (if making alterations) or very annoying if something is simply shares the same name! Once your done click “ok”.

  • It’ll take some time to upload the image, depending upon your internet connection. Once done you’ll then be taken to the properties page, here you have to fill out all the feilds maked with an *, so Title, Name, Subject, and Keywords... sorry this is a bit of a hassle but otherwise it won’t work properly! Once these have been filled out scroll to the bottom and click “Check In”.


  • Once this is done you’ll be taken back to the page we started with in step 2, you should hopefully have successfully uploaded your image, now we want its address so we can link to it in our blog...
  • Click this said image’s name and it should bring up your image.
  • Right click your image and select properties.
  • This’ll bring up a nice list of information we want the one which says Address (URL): it should start with HTTP, select it all it should start with HTTP and end with JPG. (note you can do this with any image on the internet so you don’t necessarily have to have uploaded it first!), once you have selected it right click and copy.


  • You now have your image’s url copied into your clip board.

Step2 – Attach said image to your post

This step will hopefully be a little bit simpler! There are two methods to do this depending upon which web browser you use if you haven’t got a clue what web browser your using then you’re probably using Internet Explorer.

Internet Explorer Method

  • Go to a post you want to edit or create a new post.
  • From the edit pallet select the Insert Image button (square icon with mountain and sun).

  • This will bring up a pop up box where you fill out the “Alternative Text”, this text gives the image some context if images can’t be shown or for visually impaired readers of your blog. In the Address section paste your image url. Finish by clicking ok.
  • This’ll then magically import a image into your post, sometimes your image might be waaaay to big, so use the image resize tabs to drag the image smaller.

  • And your done!

Non Internet Explorer Method (Firefox, Chrome, Safari etc)

  • Go to a post you want to edit or create a new post.
  • In the body section, you are going to add some HTML code which embeds an image; this is much like adding images etc like in the days of MySpace! Simply paste the following in the body replacing the words yourimageurl with the url you got from the first step.

    <img src="URL" width="400" />

  • Note. You can change the value in the width section to change the width, although 400 is about ideal.

  • Once you have added this press “publish” and you are done!

Delete a blog post

Sometimes you might have just written utter rubbish on your Blog or you want to delete all your “Test posts”. Well this is actually quite an easy task to do.

  • Go to your blogs main page, and select “Manage Posts” from the “Admin Links” section on the right of the page.
  • This will bring up all your blog posts, move your mouse over to the post your wanting to delete. It should highlight the post with a yellow box, to the right of which is an arrow:

  • Clicking this arrow brings up a menu, from this menu select delete, it’ll then ask you if your sure... are you? If you are then click ok!
  • And we’re done!

Re-finding your deleted blog post

So you’ve successfully deleted... the wrong post DOH! Don’t worry provided you’ve realised this fact within 30 days you should be able to retrieve it from the recycle bin!

  • Go to your blogs main page (or any page of your blog).
  • Left hand menu last link you should see in green writing “Recycle Bin” click this.
  • Tick the box to the left of the post you want to restore then click the “Restore Selection” button it’ll typically ask you if your sure... because you’d defiantly accidently go to your recycle bin tick a box and then press restore selection. And your done!

Create category’s

Category’s are quite useful things, they allow you to give some context to your blog posts, your are initially given 3 well thought out category’s of Category 1, 2 and 3 I’d suggest you create you own! To do this:

  • Go to your blogs home page
  • On the left hand menu you should see a heading of “Categories” under which listed you should see a link titled “Add new Category”
  • Fill out the title field and click ok and your done.

Some final notes

If you save for drafts you can go to your “Manage Posts” link from the home page. Bring up its sub menu and select “Approve/Reject”. This will then bring you to Approve/Reject/Pending screen select one of these and click ok.

For those of you not using Internet Explorer you can enter some simple html code into your blog posts the simplest ones are as follows:

  • <strong>Bold</strong> BOLD
  • <br /> Line break
  • <p>a paragraph</p> put the <p> at the start and the </p> at the end of a paragraph

  • <h1></h1>


  • <h2></h2>


  • <h3></h3>

  • <a href="http://bbc.co.uk">Link></a> Link

Well hope this hasn’t been to complicated for you all please leave comments or email me if you need anything cleared up?!

Tuesday 20 October 2009

Discussion Board User

It's a well known fact that children inherit characteristics from their parents i.e. my farther and mother like pasties as do I, it's a feature we were created with! When Microsoft created SharePoint they decided that every sub part of a SharePoint site should inherit permissions from its Parents. A sub part for example could be a sub site, a Blog, a Survey or in this case a Discussion Board. To be honest this is wise thinking on Microsoft's behalf since it does mean that in about 80% of cases these permissions are as we desire! However in those 20% the usual issue is that students can't reply on a discussion board... (this is because by default all students are allowed to do is read not add) not to fear since after this 10step tutorial you should (hopefully) be able to allow students to reply to your discussions!

Before we start, this tutorial as with most of my tutorials about SharePoint all presume you have Ownership rights over your Module/Programme...

1. Go to the Module/Programme site in question, and select the discussion board your wanting to let your students use:


2. Once in the correct Discussion area press the "Setting" button, this brings up a sub menu (as pictured), from this menu select "Discussion Board Settings".


3. You are then greeted by a scary looking page full of settings, don't worry take some time in reading each section if you want there are some useful settings you might want to come back to at a later date to change. However for this example we just want to change the permissions so select the link called "Permissions for this discussion board". (as shown below).


4. Tulip then shows you all the different permissions associated with that particular discussion board (I bet you wern't aware there was so many). There's not much else you can do on this page apart from select "Actions" from the Menu and then "Edit Permissions". Tulip will then warn you that you are going to change the permissions of this section and not the whole site.. or something along those lines, don't worry about what it says just click ok and move onto the next step!

If you or a colleague has already changed the permissions on your module site then this whole step will need not apply (it'll be obvious if so since this step wont make sense! Just skip this step and move onto step 5.

5. You will then be greeted with the same list only this time each user group has a little tick box to the left of it. We are wanting to change the Students group so tick the little box next to them (as shown below). Once you have ticked the right box select "Actions" from the top menu and "Edit User Permissions"


6. This brings up a list of all the permission levels you can possibly give a user, we could give the students "Full Control" but this might have repercussions as they'd be able to delete fellow students replies or edit them etc, luckily the nice chaps in Babbage (I think) have created a specific permissions group for discussion boards titled "Discussion Board User", tick the little tick box and press ok. (As shown in the image below)

7. And your done, if done correctly you should see your students group with "Read, Discussion Board User" next to it, as shown below.


Well that wasn't quite 10 steps... but I guess in this case less is better! Enjoy!

Thursday 8 October 2009

Uploading the latest version of the Midwifery E-Portfolio

Aim's/Objectives
The aim of this tutorial is to give you the latest (and greatest) E-Portfolio.

Hopefully by the time you close this window or move onto Facebook or if you're really cool Twitter, you'll have completed the following:

  • Made a back up of your old E-Portfolio.
  • Uploaded and Implemented the latest copy of your E-Portfolio.
  • Given all the correct members of staff access to your E-Portfolio.
  • Deleted your old E-Portfolio (to avoid confusion).
  • Emailed you module leads your new E-Portfolio's URL.
  • Be chuffed you have the coolest Midwifery E-Portfolio in town.*
*for a limited period only

It must be noted however that although this new E-Portfolio is the best thing since sliced bread, I still haven't managed to get around the whole "Vista" issue! It also won't magically do all your work for you, nor will it tell you what happens in the next episode of Lost of Hero's.

Backing up your Old E-Portfolio
This is strongly advised since we don't want anyone crying over spilt milk, if you've not yet got an E-Portfolio then feel free to skip this section. Please note that this section is only achievable on a Windows computer using Internet Explorer whilst on the University Campus... sorry! Before you start please prepare somewhere you want to store your backed up files, this could be on the very computer your using at this moment or on a USB drive or if your old school a CD-Rom.

  1. Open Microsoft Internet Explorer (if you don't know what this is open your web browser).
  2. Go to your current E-Portfolio, any page will do but the main page is probably the best.
  3. On the left hand menu click the first link at the top titled, "View All Site Content".
  4. Then you will be greeted with an interesting page with a sub heading titled "Document Libraries", this is the start of the back end of your E-Portfolio, think popping the bonnet on your car to expose its Engine... anyway I digress! Click the link under "Document Libraries", titled "E-Portfolio".
  5. You will then be shown a lovely list of all the files which build up your E-Portfolio, the two folders we want to make a copy of are "Documents" and "Resources" the rest can fend for themselves! The easiest way to copy these folders is to click the button titled, "Actions". This should bring up a sub-menu as shown:
  6. From this menu click "Open with Windows Explorer".
  7. This should then bring up a document folder window, much like when you look at "My Documents" on your computer or when you put in a USB Pen. From this window please select the two folders titled "Documents" and "Resources"
    • To select two separate items in a list click the first one, then press and hold "ctrl" on your keyboard and select the second item.
  8. Once you have selected the two items, copy them and paste them into your pre-prepared back up destination. Copy and paste can be done in a number of ways:
    • The easiest method is by pressing "CTRL + C" for copy and "CTRL + V" for paste.
    • Right click and select "copy" from the menu, and in your destination right click and select "paste"
    • Or once you have selected the items select "edit" from the window's menu, then copy, and in the destination's window "edit" and "paste".
  9. You should have successfuly copied and pasted your documents and resources from your E-Portfolio and they should now be stored on your local machine or USB pen. I suggest you quickly look through them all to double check.
  10. Before you move on pat yourself on your back and have a cup of tea.


Setting up the New E-Portfolio
Right let's get onto the main part of the show, the opening act has exited stage left, and the crowed is ready for the headliners to come on stage. This section can be done on any operating system and any browser...

  1. First things first you need to download the template file. Click this link, and it should ask you to download or open, please just download it to somwhere on your computer where you're going to remember its location. I recommend to your desktop. You can't actually do anything with this file just yet so don't worry if when you click to open it your computer doesn't know what to do with it.
  2. Now go to the student Portal: http://student.plymouth.ac.uk/
  3. On this page you should see on the far right hand side a box with the words "My Site" in the middle. Please click on this.
  4. You will then hopefully be taken to your "MySite" if you've not used your "MySite" before it might take some time for the system to create it. Be patient it'll magically appear before your eyes. Once loaded click on the blue box titled "Site Actions".
  5. This will bring down a sub menu as shown below, from this select "Site Settings".
  6. Site Settings is a nasty looking page with lots and lots of links, we're looking for "Site Templates", this can be found under "Galleries", pretty much slap bang in the middle. Once you've found it click through.
  7. Once "Site Template Gallery" has loaded up we want to upload the template we downloaded from from that link earlier (remember you saved it to a destination you'd remember up in step 1, once you've re-downloaded it and saved it to somewhere you'll remember this time). Click on the upload button from the top bar, as shown below:
  8. Now click on the "Browse" button and find where the Template file "Eportfolio-Sept09.stp" is located and click open. (This action is very similar to uploading a image in Facebook).
  9. Once you have clicked on "open", the Name box will be filled in, in a similar manner as shown below, the words won't match exactly since this is all based on where you saved the file to. Once you are happy with this click on ok.
  10. This will take some time to upload depending on how fast your internet is, just let it do its thing. You will then be asked to give "Title" and "Name" these should already be filled in (if not name them both "Eportfolio09", click ok.
  11. You will be brought back to where we started in the "Site Template Gallery". What have just done is give your MySite instructions on how to create your E-Portfolio, now all we need to do is tell your MySite to go ahead and create it already! To do this click on the blue box with the words "Site Actions" in.
  12. This time select "Create", as shown below.
  13. Now we're greeted with another page similar to what we saw earlier when trying to find the Site Templates however this time it's slightly different. We want "Sites and Workspaces", this is under the "Web Pages" heading.
  14. This step has some SubSteps
    • Title: Fill out Title with somethign suitable I recommend "E-Portfolio Sept 09".
    • Description: again fill out as you please, I recommend "The September 20009 update of your E-Portfolio".
    • URL name: please use "EportfolioSept09".
    • Select a Template: choose the "Custom" tab, then select "Eportfolio-090909" as shown below (yours will have fewer options than mine):
    • User Permissions: change the dot so it selects "use unique permissions".
    • The last 3 options leave as they are and click create.
  15. It'll take about 5 min for the system to create your E-Portfolio once it's done it t hing you'll hopefully be greeted with "Set up Groups for this site", as shown below. First I want you to put a semi colon (;) after your name in the last two boxes.
  16. The paste the following (minus the quote marks) into all the boxes including the last two after your name:
    • “Margaret Fisher; Alison Thoburn; Stephen Hodge; Faye Doris; Alison James; Lee Wright; Lynn Nicholls; Tina Wells; Dee Llywelyn; Rachel Redwood; Elizabeth Stenhouse; Sarah Lewis; Andrea Stebbings;”.
  17. Once you are happy with this and have something which resembles the next image press "ok"
  18. Once you have clicked ok you will then be greeted with your new E-Portfolio, this brining you to the end of the Headliner act.


Deleting your Old E-Portfolio
So next on stage is that experimental act which the headliners feel obliged to let play at their gigs but don't really want them there, and I’m sure by now your legs are hurting and you probably just want to go home. And feel free to go this isn’t essential its just a good idea so you don’t get your new shiny E-Portfolio mixed up with your old one... no-one likes drinking cold tea when a hot one's sitting right next to it!

  1. First off go to the E-Portfolio which you are wanting to delete.
    • Student Portal
    • MySite link.
    • View All Site content
    • And select your "My E-Portfolio"
  2. Now click the Site Actions button... by now you should know where it is, top right blue box...
  3. Select "Site Settings" from the sub menu.
  4. Under the 4th Column "Site Administration" select the suitably named link of "Delete this site".
  5. It'll tell you a warning I'd double check you have a back up of it as mentioned right at the start... double check your back up still works and you haven't deleted it by accident. Once your 100% sure you have it backed up click the "Delete" button.


Other Tasks...
To get to your E-Portfolio simply go to your MySite and on the left hand menu under sites you should see listed your new E-Portoflio named whatever you decided to name it.

Earlier you added a list of your Academics and myself as owners on your sites so we can check up on your work and give you any help should the need arise, however at the present we don’t know how to get to your E-Portfolio’s so could you email your Tutors the direct link to your E-Portfolio. This is quite simple:

  1. Go to your MySite
  2. Right click on the link to your new E-Portfolio and select "copy link" or "copy shortcut".
  3. Open whatever email client you use to send emails and paste that link to an email to your academics....


Right well its been a long time coming but I think we’re done! Hope you manage to get on with this one a little bit better than my previous offerings, feel free to comment or email myself if any sections are a little bit confusing or if any of the help sections in your E-Portfolio aren’t clear etc!

Thursday 20 August 2009

Demo/Tutorials - Some cool things Tulip can do: Blogs, RSS feeds, Custom Sites & Web Based Learning

Aim's/Objectives

The aim of this tutorial is to show you that Tulip/SharePoint in a VLE environment can be used for some slightly more exciting things than just as a glorified network drive.

Hopefully once you've finished reading this post (if I manage to maintain your attention for that long) you shall be able to appreciate some of the needs for:
  • Blogs
  • RSS feeds (both from and to your programme/module site)
  • Customized Programme/Module pages.
  • Web Based Learning material.
I'm also going to show you:
  • How to set up a blog on your Tulip/SharePoint site and publish your first post.
  • How to set your blogs Permissions.
  • How to find your SharePoint sites RSS feeds.
  • How to embed RSS feeds into your site.
  • Change/Add other web parts.
Blogs
I'm sure you've heard about blogs.... well you are reading one... it does seem weird writing about what a blog is on a blog.... anyway, a blog is an area or space for you to express yourself. This could be talking about the letter R, or giving a tutorial about how to use SharePoint (your reading it). As an academic your blog would be an obvious place to talk about your area's of expertise, taking Steve Wheelers blog as an example. From a LT's point of view I often find Steve's site useful but if I was one of Steve's students it would be amazing to be able to see what my tutors researching or looking at or thinking about.

RSS
RSS stands for Real simple syndicate... yeah that clears that one up... RSS is essentially a type of information different programmes can interpret... think of it as a way the internet gets informed something has been updated. So say this blog gets a new post, its RSS feed gets updated, anything which reads that feed will then be informed it's been updated. Ways you can use it, is to have a RSS reader the web browser you currently have will have one built in, so say you follow Medical News Today's RSS feed when they update you will know.

Great I hear you saying "what's this to do with SharePoint?" there are two ways you can use RSS feeds in SharePoint, every update-able part of a SharePoint/Tulip site has its own RSS feed and every time you change anything on the said site its RSS feed will get updated. So tech savy students can follow their modules RSS feeds and be alerted every time a module/programme gets updated (this will be used by about 3 students in the entire university). The second more useful way of using RSS feeds in SharePoint is that you can embed different feeds into your SharePoint site.


Above I've rather cheekily for examples sake embedded Medical News Today's Neurology RSS feed into a Neurology module page. Just think your students can go to their module sites and get the most up to date news about key subjects.

Customised Programme/Module Pages - Web Based Learning
Above you witnessed that your module page doesn't have to just be of the plane standard format, we can add RSS feeds into pages, you can also add Picture libraries and many other things. Once going down the customised SharePoint page you really are opening a can of worms.
However one of the better ways of customising your Tulip/SharePoint pages is being able to create some sort of Web Based Learning material. I've shown you this in previous posts but possibly most notable is Anne Roberts "Applying Evidence to Practice-Study material":


Why constantly link students to others on-line study material which kinda hits the point when you could simply create your own?!

Great so how do I go about doing any of this?

Blogs

Probably the most complicated task is how do create a blog. But if you follow these steps you should be able to get your blog on in under 10min!

Blogs can be created on any SharePoint site this being Tulip or your MySite, as generally blogs are used for personal reflections it makes sense to create a blog on your MySite. (if you are a none UOP user and want to know how to create a blog on your SharePoint site simply skip the first step and go to a SharePoint page)

  1. Go to http://intranet.plymouth.ac.uk and click on the "My Site" button. (if you've never been on your MySite before it shall take a couple minutes for SharePoint to create one for you).
  2. To the top right of your screen you should see a link which says "Site Actions" click this then select "Create":
  3. You'll then be greeted with a 5 columns of bullet points, in the 5th column titled "Web Pages" there should be a bullet point titled "Sites and WorkSpaces" click this.
  4. You will then be greated with a page like below please fill out as described in the image (click image to enlarge it):Once you have filled it out scroll down the page and select "create".
  5. Once the next page has loaded you will be greeted with your newly created blog:Now all you need to do is publish your first post, on the right hand menu "Admin Links" you should see a bullet point titled "Create a post" click this.
  6. Fill out your Post's title, the body should consist of what your wishing to write about! And that's all there is to it.
Setting your blogs permissions
Your blog is set by default that all users can view your blog and only you can add to it. You might want to change this to add a colleague or a group of students to also contribute to it. This is done by doing the following.
  1. Clicking the "Site Actions" button (top right hand of the page) and selecting the last option from the pop up menu "Site Settings".
  2. We are again greeted with the 5 columns of bullet points. We want to select "Advanced Permissions" which is under the first column of "Users and Permissions".
  3. Your then shown a table of all users, take a time to read this it should make sense in a round about way, ("NT AUTHORITY\authenticated users" is a group for anyone who has a UOP login). We want to add a new contributor, so select "NEW" from the top left of the table area.
  4. You should then be greeted with a similar screen to as shown below, please do as instructed in the image (click the image for it to expand).
  5. Once this is done you will be brought back to the original list of permissions and your newly added users should be listed.
RSS
As mentioned SharePoint/Tulip sites have their own RSS feeds I say feeds as infact every part of a tulip site which can be updated has its own feed so you can really knuckle down to the exact news you want to know (thanks Nick), usually your browser will alert you if the site you are on has any linked feeds. Two examples are shown below:

Internet Explorer:
FireFox:
You will notice the RSS feed logo whenever you see this there is usually a RSS feed linked. Once you've clicked this link the address in the top bar is the RSS feed URL, you will need to copy this to give it to any RSS readers.

How do you get these Feeds into your Tulip page?
To embed a RSS feed into your Tulip page you have to add the RSS viewer web part. So go to a Tulip/SharePoint site which you have ownership permission on and would like to embed some RSS into.

For this Example I'm using OCT518 (Anne Roberts module page) you then need to follow the next couple of steps:
  1. Top Right hand corner of the page select "Site Actions" and from the sub menu select "Edit Page".
  2. This will highlight all the different web parts on the page:
  3. Select "Add a Web Part" from whichever section you want to add your RSS feed to...
  4. You will then be greated with a rather nasty looking list of different web parts you can add... scroll down the list and under "All Web Parts" and "Default" you should see "RSS Viewer", select the tick box next to this and then choose add from the bottom.
  5. You will then be back to your original page showing you all the different web parts, hopefully you will have your newly added "RSS Viewer" web part. On it will say "Web part is not bound to a feed. Open the tool pane to set the feed Url." click on this link.
  6. This will bring up the RSS viewer's menu: From this past in your RSS feed (how to find you RSS feed was shown above) and click ok.
  7. Welldone! You've added an RSS feed to your home page, and in doing so have also customised your SharePoint site! Highfives all round!

Monday 13 July 2009

Jacob Gibbins - Photography

Jacob Gibbins is arguably one of the South Wests most up and coming cycling photograher (his style's not just restricted to cycling but it is the main field he excels in). However what Jacob makes up in photography skills he slightly lacked in website design. So I decided to put my skills to use in helping a fellow Photographer/Cyclist out.

Now I'm not saying at all that I have good web design skills or coding skills but I do like to think I'm not terrible at either so here's what I made for Jacob:

His full site can be viewed: http://www.jacobgibbins.co.uk/

As always wherever I've tried where I can to make my work under creative commons act so feel free to nab the HTML and CSS (obviously all images are copyright to Jacob Gibbins so don't nab them!)

I've also uploaded the FLV file so feel free to use this also under creative commons. I tried to comment wherever I felt people might get confused. My plans are to make a proper loader bar between images and to tidy the code up some what. But I am getting married in less than 3 weeks so this website has slipped a tad in priorities!

The idea of this FLV file was to have an easily accessed and mostly protected set of Jacobs top 33 images. Sadly it really only works for landscape images but two portraits side by side also works! I wanted to create a flash file which meant Jacob wouldn't have to constantly edit some flash file to alter his top 33 images. I got around this by getting the flash file to search the folder "MainPhotos" on his server and grab the pre numbered images from there. So simply changing these images is all he needs to do to change his portfolio images. Making sure they have the same names and it should be simple as!

Wednesday 8 July 2009

Googles OS - why I didn't bet!

It's everywhere I feel I should write something about this here... Google have annoucned their making an Operating system to contest with Linux, Windows and OSx: http://news.bbc.co.uk/1/hi/technology/8139711.stm

The reason I'm writing about it is that I want to say what I think their plan will be so when it happens I can refer back to this post and go I predicted this much like me and my brother predicted them eventually making a OS after releasing Chrome, if only we'd laid a bet on it happening!

My predictions, Chrome OS, will be a very slim lined OS think Iphone style, based fully around a online content, with everything being stored online and not on your computers memory with small apps accessing this data as requested. I feel googles aim here is that you could log into anyone's computer running chrome and have your desktop with you, true cloud computing style. Much like it is within any buisness hot desking etc. This will mean google will own everything.. a scary thought but with Googles track record I'm happy for this to happen!

What this will mean for E-Learning... with the lack of need for a resource hungry computer we can have very cheep and small netbooks running Chrome OS perfectly fine. Which will hopefully mean E-learning will be accessible to far many more people (not that there are an abundance of people without computers in the UK). From an Learning Technologists Point of view, I'm going to have to learn how to code for Chromes apps, and will have to create more online resources, (which is what I mostly do now).

Errm that's all I have for now, feel like a pleb for saying all this but just don't want it to emerge later and for me to have been right but with no evidence that I thought all this. I might be totaly off here but still that's my say.

And lastly... It's already made! The Chome browser was just released no hype no nothing because, google sent a publicity person the wrong link, I rekon they've already made Chome OS...

Friday 3 July 2009

Some START progress

Well it seems I've finished the majority of the back end work for this project, successfully integrating Twitter, Picassa and Blogger into one page using, PHP & XML... Which I'm quite happy with seeing as prior to this project I've not coded anything in php! As part of me trying to maintain the whole creative commons thing and trying to share and share alike thingy here's the code I've used:

Blogness.php - Grabs the xml from the rss feed and displays all posts:
Adapted from: http://www.hiash.com/blogger.php

<?php
define('MAGPIE_DIR', '../../magpierss/');
require_once(MAGPIE_DIR.'rss_fetch.inc');

//RSS feed has to be of ATOM format
$rss = fetch_rss( 'http://www.blogger.com/feeds/8911594570691911602/posts/default' );

//display latest blog content:
foreach ($rss->items as $item) {
$title = $item['title'];
$content = $item['atom_content'];
echo "<h1>$title</h1><p>$content</p>";
}
?>


Twitterness.php - grabs the rss from your public twitter feed and displays the last 5 posts...
Adapted from http://workbench.cadenhead.org/twitter-rss-to-html/


<?php

define('MAGPIE_DIR', '../../magpierss/');
require_once(MAGPIE_DIR.'rss_fetch.inc');

$tweets_to_display = 5;
// the page where the tweet(s) will be displayed
$page = "";
// the user's Twitter username
$username = "StartPlymouth";


$rss = fetch_rss( 'http://twitter.com/statuses/user_timeline/49595711.rss' );

// start buffering output
ob_start();

$count = 1;
$now = time();


foreach ($rss->items as $item) {
// limit the number of tweets displayed
if ($tweets_to_display > 0) {
if ($count > $tweets_to_display) {
continue;
}
}
$tweet = $item['description'];
// ignore tweets linking back to page (if it is defined)
if ($page != "") {
if (!strpos($tweet, $page) === false) {
continue;
}
}
// figure out how recently the tweet was posted
$when = ($now - strtotime($item['pubdate']));
$posted = "";
if ($when < 60) {
$posted = $when . " seconds ago";
}
if (($posted == "") & ($when < 3600)) {
$posted = "about " . (floor($when / 60)) . " minutes ago";
}
if (($posted == "") & ($when < 7200)) {
$posted = "about 1 hour ago";
}
if (($posted == "") & ($when < 86400)) {
$posted = "about " . (floor($when / 3600)) . " hours ago";
}
if (($posted == "") & ($when < 172800)) {
$posted = "about 1 day ago";
}
if ($posted == "") {
$posted = (floor($when / 86400)) . " days ago";
}
// filter the user's username out of tweets
$tweet = str_replace($username . ": ", "", $tweet);
// turn URLs into hyperlinks
$tweet = preg_replace("/(http:\/\/)(.*?)\/([\w\.\/\&\=\?\-\,\:\;\#\_\~\%\+]*)/", "<a href=\"\\0\">Link</a>", $tweet);
// link to users in replies
$tweet = preg_replace("(@([a-zA-Z0-9\_]+))", "<a href=\"http://www.twitter.com/\\1\">\\0</a>", $tweet);
echo '<p class="Tweets"> <strong>'.$username.':</strong> '.$tweet.'</p><p class="TweetInfo">'.$posted.'</p>';
$count++;

}

// display output
ob_end_flush();
?>

Picassaness.php - This one is the most complex but doesn't require Magpierss which is cool, does the same grabs public xml, I've got it to store all the images in an array and select a random 5 and display them. (to change on each refresh):
(I adapted from - http://code.lawpower.net/2008/01/21/picasa-gallery-googles-cruel-rss-feed/)

<?php
$DisplayNumberofPhotos = 5;

function AddXMLtoItems($xmlurl){
//get the xml from the feed provided in $xmlurl
$session = curl_init($xmlurl);
curl_setopt($session, CURLOPT_HEADER, false);
curl_setopt($session, CURLOPT_RETURNTRANSFER, true);
$response = curl_exec($session);
curl_close($session);
$xml = simplexml_load_string($response);
$items = $xml->channel;

//now we have each item from the XML file into $items we now need to split them up so their more useful to us
foreach($items->item as $item){
$title = $item->title;
$content = $item->description;

//pull the images from the *descripotion* section
$quotes = array('"', "'", "\n");
$imgContents = str_replace($quotes, '', $content); #Strip " and ' as well as \n from input string
$imgContents = stristr($imgContents, 'src='); #Drop everything before the 'src'
$endTagPosition = stripos($imgContents, 'alt'); #Position of the end tag '>'
$img = substr($imgContents, 4, $endTagPosition - 4); #Get everything from src to end tag --> 'src="path" something>'

//Change the dimentions of the images, Picasa sets images sizes at specific sizes within the url
$ImageURL = str_replace('/s288', '/s220', $img);
$ImageURLs[] = $ImageURL;
}
return $ImageURLs;
}

//Grab the images from the array and merge them all into one big array...
$ImageURLs = AddXMLtoItems("http://picasaweb.google.com/data/feed/base/user/StartPlymouth/albumid/5354140273775432289?alt=rss&kind=photo&authkey=Gv1sRgCOGggY2Y8baMLw&hl=en_US");
//$ImageURLs2 = AddXMLtoItems("");
//$ImageURLs3 = AddXMLtoItems("");
//$ImageURLs4 = AddXMLtoItems("");
//$ImageURLs = array_merge((array)$ImageURLs1, (array)$ImageURLs2, (array)$ImageURLs3, (array)$ImageURLs4);

//Now we need to grab random images from this array to be displayed on the home page
for ( $counter = 0; $counter <= ($DisplayNumberofPhotos - 1); $counter += 1) {
//get ImageToDisplay to be a exact image number
$ImageToDisplay = sizeof($ImageURLs);
$ImageToDisplay = rand(0, $ImageToDisplay);
$ImageToDisplay = round($ImageToDisplay);
$ArrayofImagesBeenDisplayed[] = $ImageToDisplay;
}
//add image displayed to an array to ensure we don't get duplications
$ArrayofImagesBeenDisplayed = array_unique($ArrayofImagesBeenDisplayed);

//Display these random images and link them to a larger image
for ($counter2 = 0; $counter2 < sizeof($ArrayofImagesBeenDisplayed); $counter2 += 1) {
$ImageDisplayURL = $ImageURLs[$ArrayofImagesBeenDisplayed[$counter2]];
$ImageLinkURL = str_replace('/s220', '/s1024', $ImageURLs[$ArrayofImagesBeenDisplayed[$counter2]]);
echo "<a href='" . $ImageLinkURL . "'><img src='" . $ImageDisplayURL . "' /></a>";
}
?>


Obviously I'm no coder and I'm sure this will make some of you spit your coffee out at your computer screen, but I'm sure some of you will find it useful! Any feedback would be good. I've made these seporate files to be called into the main page by using Include('file.php'); so should hopefully work with you, for the picassa one you have to declare how many images you want displayed: $DisplayNumberofPhotos = 5; include('Picassaness.php') In the picassa one I would quite like it to find all rss feeds related to that piccassa user rather than having to list each individual album manually so if anyone knows how to do that, that would be great. Otherwise shall try and work it out myself and post it here.

Friday 26 June 2009

START - Progress and Windows 7!

As you can hopefully see I've progressed with the sites design, some what and am rather happy with how it looks:

My next major task is to arrogate all the random feeds I've suggested Start to sign up to, i.e. Twitter, Blogspot and Picasssa. I initially aimed to use Twitter and Googles API to do this but was just running into constant problems. Which was a shame but being a slight novise to PHP I couldn't afford to waste to much time.

What I did manage to do was use MagpieRSS which with some coding grabs Twitters and Blogspots RSS feeds and displaying them in your PHP. Magic! Some of the usefull links I've been using:

http://workbench.cadenhead.org/twitter-rss-to-html/
http://www.hiash.com/blogger.php
http://magpierss.sourceforge.net/

Due to the none pleasant working conditions of Center Court when its warm weather, lack of air flow and bad sewage smells, and thanks to the lame guttering I've chosen to work from home for a couple days. Which has been far more productive than in the office this is down to a few key points:

  • Windows 7 - Microsoft really have got it going on here kicking dust in OSX's eyes due to a number of reasons, mostly their Task bar (admittedly they've just copied Linux and OSx here but if it works why complain!), I also like their snap windows to edges system which I've been using heavily on this project.
  • 1000watt sound system, keeps me going
  • 27inch screen also helps!

Friday 12 June 2009

Train the Trainer - Photography Basics - Beyond the Snapshot

Aim of this Session:
  • To help you improve upon your current photography skills, and to alert you of standard techniques and to apply them in practice.

By the end of this session you should:
  • Be aware of some of the key photography rules
  • Be able to apply these rules to your own photos
  • Hopefully take nicer photographs.

What makes these following images stand out:


The thing which makes images stand out from others is that they have a good composition, a photo's composition can be broken down to rules:
  • Focus
  • Rule of Thirds
  • Lines
  • Headroom
Focus
Might seem obvious, but keeping prominent parts of the image in focus:


Rule of Thirds:
The golden rule of thirds, keep areas of interest at every third of the image.


Lines:
Another technique to gain interest in key areas of a photo. Use lines to guide the viewers eyes to key areas of the image. (below the path attracts the viewers eyes to the rider)


Headroom:
Leaving too little or too much space around an object. (below the object is to small compared to its surroundings, doesn't attract your eye's attention)


Further reading:

Top 10 Photography Composition rules:
http://www.amateursnapper.com/photography/10-top-photography-composition-rules
Rules of photo composition:
http://www.colorpilot.com/comp_rules.html

Please feel free to leave comments if you require any further information in certain areas.