Hopefully once you’ve finished reading this post you will be able to do the following:
- Know what a blog is
- Find your blog
- Post to your blog
- Add Photos to your blog
- Editing/Deleting your posts
- Add/Remove Comments
If your on the SCW538 module or otherwise we’re going to show you how to use Pebble Pad’s blogging technology. The reason this is the case as opposed to you creating your own blog through BlogSpot or Wordpress is mostly due to security and confidentiality issues, your blog has been set up so only yourself and fellow course mates are able to view your blog posts, although this does have a certain level of damage prevention should you accidentally expose a patients confidentiality all attempts to prevent a slip up should be adhered to.
Getting to your blog
As discussed your blog is situated on Pebble Pad to logo into Pebble Pad go to the following address:
At the login screen enter your standard university username and password, the same one you use to access your Emails, Tulip or Emily. Once logged in feel free to have a little play around with all the features that pebble pad has after all, all we're using it for in this example is blogging but PebblePad is much much more than just a blog tool! If you wanna just get to your pre-set up blog then just click through to your assets store as shown below:

Once in your assets store you might find a large number of documents or none at all it all obviously depends upon how much you have used your pebble pad account! Along the top of the list of your assets you should see a tab called "received". Click this tab:

Once within the "received" tab scroll till you see your name listed there. Once found click on it:

Now we are in your actual blog
You should hopefully see something along the lines of this:
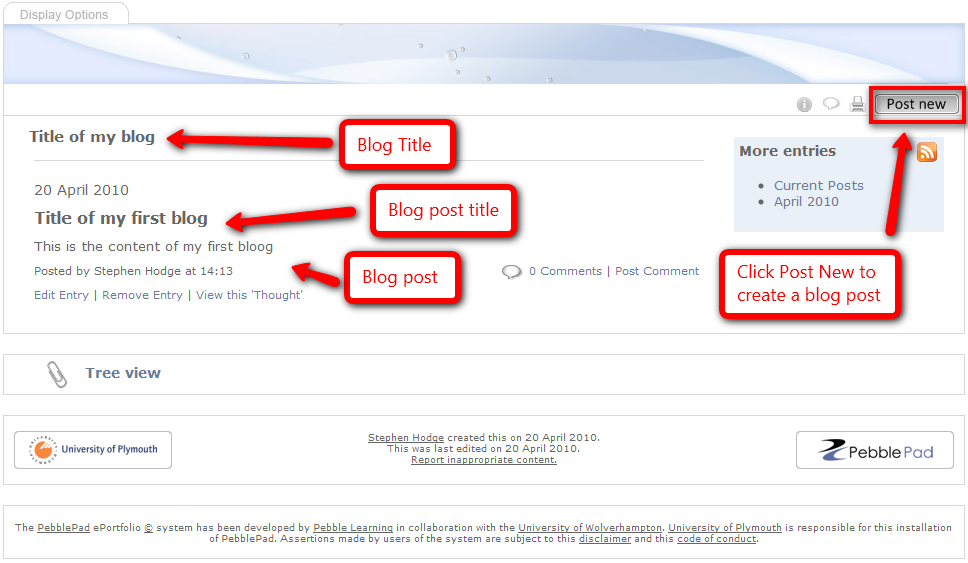
Post to your blog
From the page above you might be able to see the button which says "Post New", this is quite self explanatory so go ahead and click it already! Once clicked a pop up window like below will appear:

Adding a Photo to your Post
As the saying goes 'a picture is worth a thousand words', you might want to save some time and just show a photo of what your trying to explain. Try to maintain confidentiality (unless prior consent has been given) and avoid copyright infringements etc, further information on copyright can be found here:
Anyway, adding photos is as easy as pie with PebblePad, see the above image where it says "File" and then "Choose File" button, press this said button. This will bring up the browse to file window, select your image and press open: (the image below is dependant upon your operating system however you will be greeted with something of a similar nature)

Once you have done this submit your blog post and the image should automatically upload at the same time. Hopefully that's all you need to know about authoring your own blog posts.
Editing/Deleting posts
If we go back to your PebblePad home page, you should notice that after creating some blog posts you'll notice some newly created assets in your store. Visit your said assets store:

As explained in the image, any asset with a thought cloud icon is a blog post, it's title will match your blog posts title (obviously). If you wish to edit or delete the post, simply select the said thought, click edit this asset to edit it, or click more options, this brings up a pop up box from this select "remove".
Commenting
Part of the nice thing about blogs is that you can get a nice community going and due to the usually faceless nature of blogs means its less intimidating to comment on people's views than it would be than say in a classroom type environment. To comment on your own of other people's blogs go the assets store and like earlier select the "received" tab, from here you can see your own blog and hopefully your fellow students blogs, select any blog you want to comment on. Click the same button you used earlier "View and post to blog".
At the bottom of each blog post you should see a little speech bubble icon, followed by how many comments there are listed:

If someone has posted something on your blogpost and you feel its impact is of a destructive nature then you can remove the comment, to do this go to the said blog post, at the bottom of which it should list comments, click through this link, then it should display comments along with a "Remove" link, likewise if its a comment you've posted you can remove and edit it:

Hopefully that's all you need to know about blogging with Pebble Pad, please feel free to email myself or comment on this post if there's anything incorrect or missing or if you just want to say hello!