Aim's/Objectives
The aim of this tutorial is to give you the latest (and greatest) E-Portfolio.
Hopefully by the time you close this window or move onto Facebook or if you're really cool Twitter, you'll have completed the following:
- Made a back up of your old E-Portfolio.
- Uploaded and Implemented the latest copy of your E-Portfolio.
- Given all the correct members of staff access to your E-Portfolio.
- Deleted your old E-Portfolio (to avoid confusion).
- Emailed you module leads your new E-Portfolio's URL.
- Be chuffed you have the coolest Midwifery E-Portfolio in town.*
*for a limited period only
It must be noted however that although this new E-Portfolio is the best thing since sliced bread, I still haven't managed to get around the whole "Vista" issue! It also won't magically do all your work for you, nor will it tell you what happens in the next episode of Lost of Hero's.
Backing up your Old E-Portfolio
This is strongly advised since we don't want anyone crying over spilt milk, if you've not yet got an E-Portfolio then feel free to skip this section. Please note that this section is only achievable on a Windows computer using Internet Explorer whilst on the University Campus... sorry! Before you start please prepare somewhere you want to store your backed up files, this could be on the very computer your using at this moment or on a USB drive or if your old school a CD-Rom.
- Open Microsoft Internet Explorer (if you don't know what this is open your web browser).
- Go to your current E-Portfolio, any page will do but the main page is probably the best.
- On the left hand menu click the first link at the top titled, "View All Site Content".
- Then you will be greeted with an interesting page with a sub heading titled "Document Libraries", this is the start of the back end of your E-Portfolio, think popping the bonnet on your car to expose its Engine... anyway I digress! Click the link under "Document Libraries", titled "E-Portfolio".
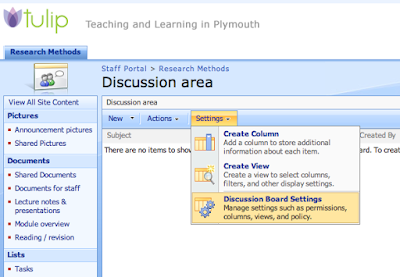
- You will then be shown a lovely list of all the files which build up your E-Portfolio, the two folders we want to make a copy of are "Documents" and "Resources" the rest can fend for themselves! The easiest way to copy these folders is to click the button titled, "Actions". This should bring up a sub-menu as shown:

- From this menu click "Open with Windows Explorer".
- This should then bring up a document folder window, much like when you look at "My Documents" on your computer or when you put in a USB Pen. From this window please select the two folders titled "Documents" and "Resources"
- To select two separate items in a list click the first one, then press and hold "ctrl" on your keyboard and select the second item.
- Once you have selected the two items, copy them and paste them into your pre-prepared back up destination. Copy and paste can be done in a number of ways:
- The easiest method is by pressing "CTRL + C" for copy and "CTRL + V" for paste.
- Right click and select "copy" from the menu, and in your destination right click and select "paste"
- Or once you have selected the items select "edit" from the window's menu, then copy, and in the destination's window "edit" and "paste".
- You should have successfuly copied and pasted your documents and resources from your E-Portfolio and they should now be stored on your local machine or USB pen. I suggest you quickly look through them all to double check.
- Before you move on pat yourself on your back and have a cup of tea.
Setting up the New E-Portfolio
Right let's get onto the main part of the show, the opening act has exited stage left, and the crowed is ready for the headliners to come on stage. This section can be done on any operating system and any browser...
- First things first you need to download the template file. Click this link, and it should ask you to download or open, please just download it to somwhere on your computer where you're going to remember its location. I recommend to your desktop. You can't actually do anything with this file just yet so don't worry if when you click to open it your computer doesn't know what to do with it.
- Now go to the student Portal: http://student.plymouth.ac.uk/
- On this page you should see on the far right hand side a box with the words "My Site" in the middle. Please click on this.
- You will then hopefully be taken to your "MySite" if you've not used your "MySite" before it might take some time for the system to create it. Be patient it'll magically appear before your eyes. Once loaded click on the blue box titled "Site Actions".
- This will bring down a sub menu as shown below, from this select "Site Settings".

- Site Settings is a nasty looking page with lots and lots of links, we're looking for "Site Templates", this can be found under "Galleries", pretty much slap bang in the middle. Once you've found it click through.
- Once "Site Template Gallery" has loaded up we want to upload the template we downloaded from from that link earlier (remember you saved it to a destination you'd remember up in step 1, once you've re-downloaded it and saved it to somewhere you'll remember this time). Click on the upload button from the top bar, as shown below:

- Now click on the "Browse" button and find where the Template file "Eportfolio-Sept09.stp" is located and click open. (This action is very similar to uploading a image in Facebook).
- Once you have clicked on "open", the Name box will be filled in, in a similar manner as shown below, the words won't match exactly since this is all based on where you saved the file to. Once you are happy with this click on ok.

- This will take some time to upload depending on how fast your internet is, just let it do its thing. You will then be asked to give "Title" and "Name" these should already be filled in (if not name them both "Eportfolio09", click ok.
- You will be brought back to where we started in the "Site Template Gallery". What have just done is give your MySite instructions on how to create your E-Portfolio, now all we need to do is tell your MySite to go ahead and create it already! To do this click on the blue box with the words "Site Actions" in.
- This time select "Create", as shown below.

- Now we're greeted with another page similar to what we saw earlier when trying to find the Site Templates however this time it's slightly different. We want "Sites and Workspaces", this is under the "Web Pages" heading.
- This step has some SubSteps
- Title: Fill out Title with somethign suitable I recommend "E-Portfolio Sept 09".
- Description: again fill out as you please, I recommend "The September 20009 update of your E-Portfolio".
- URL name: please use "EportfolioSept09".
- Select a Template: choose the "Custom" tab, then select "Eportfolio-090909" as shown below (yours will have fewer options than mine):

- User Permissions: change the dot so it selects "use unique permissions".
- The last 3 options leave as they are and click create.
- It'll take about 5 min for the system to create your E-Portfolio once it's done it t hing you'll hopefully be greeted with "Set up Groups for this site", as shown below. First I want you to put a semi colon (;) after your name in the last two boxes.

- The paste the following (minus the quote marks) into all the boxes including the last two after your name:
- “Margaret Fisher; Alison Thoburn; Stephen Hodge; Faye Doris; Alison James; Lee Wright; Lynn Nicholls; Tina Wells; Dee Llywelyn; Rachel Redwood; Elizabeth Stenhouse; Sarah Lewis; Andrea Stebbings;”.
- Once you are happy with this and have something which resembles the next image press "ok"

- Once you have clicked ok you will then be greeted with your new E-Portfolio, this brining you to the end of the Headliner act.
Deleting your Old E-Portfolio
So next on stage is that experimental act which the headliners feel obliged to let play at their gigs but don't really want them there, and I’m sure by now your legs are hurting and you probably just want to go home. And feel free to go this isn’t essential its just a good idea so you don’t get your new shiny E-Portfolio mixed up with your old one... no-one likes drinking cold tea when a hot one's sitting right next to it!
- First off go to the E-Portfolio which you are wanting to delete.
- Student Portal
- MySite link.
- View All Site content
- And select your "My E-Portfolio"
- Now click the Site Actions button... by now you should know where it is, top right blue box...
- Select "Site Settings" from the sub menu.
- Under the 4th Column "Site Administration" select the suitably named link of "Delete this site".
- It'll tell you a warning I'd double check you have a back up of it as mentioned right at the start... double check your back up still works and you haven't deleted it by accident. Once your 100% sure you have it backed up click the "Delete" button.
Other Tasks...
To get to your E-Portfolio simply go to your MySite and on the left hand menu under sites you should see listed your new E-Portoflio named whatever you decided to name it.
Earlier you added a list of your Academics and myself as owners on your sites so we can check up on your work and give you any help should the need arise, however at the present we don’t know how to get to your E-Portfolio’s so could you email your Tutors the direct link to your E-Portfolio. This is quite simple:
- Go to your MySite
- Right click on the link to your new E-Portfolio and select "copy link" or "copy shortcut".
- Open whatever email client you use to send emails and paste that link to an email to your academics....
Right well its been a long time coming but I think we’re done! Hope you manage to get on with this one a little bit better than my previous offerings, feel free to comment or email myself if any sections are a little bit confusing or if any of the help sections in your E-Portfolio aren’t clear etc!


 If you or a colleague has already changed the permissions on your module site then this whole step will need not apply (it'll be obvious if so since this step wont make sense! Just skip this step and move onto step 5.
 7. And your done, if done correctly you should see your students group with "Read, Discussion Board User" next to it, as shown below.


