I'm no expert, and I don't class myself as a knowledgable person... however I'm happy to share anything I feel other people might benefit from. So hope you leave benefited!
Thursday, 14 October 2010
Standardisation + Paramedics instigated via SharePoints wiki/page edit facility..
Ok I realise I'm constantly harping on about Wiki's on SharePoint/Tulip, its not that I have a particular attachment to Wiki's its just that the page edit facility on SharePoint 2010 is based on Wiki's... which obviously makes it 100% ok... yeah... ok deal!
A long time ago I received a slightly confusing email from support desk asking me to help create something along the lines of a Standardisation tool for Paramedic students... for some reason Support Desk had been approached for an E-Learning question (yet I get inundated with support calls oooh the irony!), anyway the idea behind this project was that when conflicting statements get given from "external lecturers" if there was a way to log these issues, to be clarified by the course lectures. Now my first thought was oh Share Points forum facility will be perfect for this. However the student who originated this problem (incase your curious why I'm taking ideas from students now, his academics encouraged him to pursue this himself so basically I had the green light and backing from his academics) pointed out that this process should be a lot more organised and structured. In fact I believe he held a similar practice within the armed forces (although not digital).
So this lead me to think ah ha some sort of form which students can contribute to, this could indeed have been a simple Word document people can edit... but who wants to use word documents in this day and age... BRING ON THE CLOUD! (bring on the wall?)
So my plan was to create a editable page on SharePoint2010 (Tulip) which had a pre formatted Table for students to add to as and when the issue of standardisation arises. This has been housed on the Paramedics Main Program site so all years can add to this form.
So how do I get to this Standardisation Log?
Currently this Log is only on the Paramedic Practitioner (Community Emergency Health) program site, but I'm sure with time this idea might spread to other courses. You can access the log by clicking the link on the left hand menu titled "Standardisation Log".
Great so I'm at this Log... I need to raise a query
Well I've given all students on the site contribute rights to this page so all you need to do is bring up the edit panel that can be done by clicking on the little note book icon:
Then the whole page becomes editable to create a new line in the table simply go to the last box "complete" and press the TAB button, then type away completing your query. When your done, you need to make sure you click the "Save & Close" button otherwise your changes won't be saved. If your a student that's all you need to know.
So how do academics get to know about these changes?
For the moment no notifications have been set up... mostly because I've not been told who the academics to notify are yet! However using SharePoints Alert Me Tool I hope to keep academics and students in the loop about any modifications to this Standardisation Log.
Wednesday, 13 October 2010
Ladies and Gentle Men I bring you... UpMedia... how to upload and how to view...
- Go to your site and click on the bottom link on the left hand menu "Administration".
- Under the tiny heading of "Create" you should see three links... no they are three links not just one long link (heard of lists?), click on "More". (as shown below)
- Then BAM you should see a link titled "UpMedia" and their snazy logo (fair play whoever created that logo does look cool). Click on this link. (again as shown below)
- You'll be asked to give it a name and if you would like emails upon changes and if you want it displayed in the left hand menu (tick as you so desire).
- Click submit and your done!
- Go to the newly created library, if you ticked the box for it to appear in the quick menu it'll be listed under "Lists".
- Then click on the "add new item" link:
- This'll bring a pop up window where it'll ask you to browse for the file you wish to upload, browse for the said file and click ok. (I've found it doesn't like files over 2gb).
- As soon as your click ok it'll start uploading:
- Once the uploading process has done it'll put a little tick to the left of the name... I'm assuming it'll refresh over time but to give it a little prod click the greyed out "ok" button to get it to refresh (don't click your refresh button).
- You'll then be asked to fill out some key information fill it out and click "Continue" take note as you go through the "tick boxes" as this is where you can list it on itunesU etc (more on this once the systems properly live).

(click to make it bigger) - Your final step is to select a screen grab to be used as a thumbnail (or you can upload your own custom one). and where you would like your file to be listed under etc click finish and your upload will be complete.
- It'll finish by giving you a message of "You are logged in as: [username] Media file data saved successfully". Then close this box (it doesn't close automatically yet).
- Refresh your page and BAM your newly uploaded file will display.
- Go to your UpMedia library with the newly uploaded file. Click on the thumbnail and it'll start downloading.
- If you have VLC or RealPlayer on your computer it'll play fine....
- If not download VLC for free PLEASE download VLC not RealPlayer... although use RealPlayer if you want just I'll sleep better at night knowing your using VLC instead of RealPlayer.
Tuesday, 12 October 2010
Forget my VLE I want to get mashed up....
So where can I put these files?!
There are a number of solutions here the most trusted option in my opinion comes from the big G - Google. In 2007 Google started its bold steps into the area of cloud computing, having your data stored externally and accessible anywhere in the world. Google Docs is in fact a truly magical thing to use first off all you need is a browser so goodbye Microsoft Office (for personal use all my word processing is done on my Google account), and best of all its all free! Google Docs allows you to invite sharer's so you can collaborate and edit the same document together take a look at this little video which explains this all in a bit more depth:
So how do I get started?
Well first log into your Google Docs account with your Google account.. you might already have a Google Account, if you've used Blogspot, Picasa, Youtube, Gmail that account will work... if your yet to have a Google Account then where have you been? Jump on in and become a part of one of the greatest things on the internet!
- Go to http://docs.google.com log in
- Click on the Upload button:
- Next Click on the link which says "Select files to upload", that'll bring up the browse to file window find the file you wish Google to host and click ok.
- Your file should then be listed you can upload multiple files here if you so desire. Ensure the 'Convert documents, presentations, and spreadsheets to the corresponding Google Doc formats' box is checked. When your happy click "Start Upload":

- It'll take a couple seconds or so to upload (depending upon your internet connection). Once done click on the file name to check its all ok:
- This will open the document up in a new window on the far right side of the page you should see a button titled "Share" click on the little drop down arrow to the right of it. You'll get a couple of options such as 'sharing options', that allows you to select specific people to share your document with which is emailed to them via a specific link, however we want the whole world to see my amazing document so I'm going to click on "Publish to the Web":
- You'll get a pop up box click the "Start Publishing" button right in the middle and magically your documents URL will be displayed:
Hope this was of some help you can stop sharing whenever you feel fit, Google's Policy is that if you delete something on their servers they won't keep it, so don't worry about them being sneaky with your files!
Friday, 8 October 2010
Our Survey says....
Survey's are great... ok no they're not they're both a pain to create and a pain to fill out! So why not make this painful process as simple and easy as possible?! Let SharePoint (tulip) do the hard work! Incase you've not caught on by now SharePoint has a built in Survey tool and its pretty cool if I'm honest!
How do I get to this "Pretty cool" survey tool then?
This "Pretty Cool" can be found on your SharePoint site of choice under the left hand menu "Surveys" its the very top option you might very well have missed it I know it took me some time to find it! If you click on this link you'll be brought through to the page which lists all the surveys your SharePoint site has, I'm assuming that by looking at this tutorial this'll just have the dummy survey created by default!
So lets get on and create a survey, some advice if your yet to fully arrange the finer details of your survey asides from the fact you actually want to create one I suggest you create a couple dummy surveys first so you know what this tool is capable of doing first. Since it seams when it comes to creating a survey the technology is a tiny bit of a barrier, this is regardless of the platform your using in fact I've found SharePoints survey tool to be quite powerful!
Steps to creating your first Survey:
I'd like to note that I'm creating this dummy survey on a mac using safari with Silver Light not installed (so pretty much the most backwards way of using a Microsoft product)
- Go to your SharePoint site, click on the "Surveys" link on the left hand menu.
- Click "Create" from this new page.
- Under "Tracking" select "Survey".
- Give it a suitable name and if you feel you need to give it a description do so, you have the option to make it display in the "quick launch" menu, this is the left hand menu. The following two options are useful, of "Show User Names" and "Allow multiple responses", they've both quite self explanatory, you do however get the chance to change these later if needs be. When your happy here click next. Its sometimes worth allowing multiple responses start with as it allows you to test the survey a number of times once done!
- You then get thrown right in the thick of it by constructing your questions. Its worth noting that although its useful to get this initial stage all done 100% correct its not vital since all information can be changed if so desired, i.e. question, type of answer and order can be altered and removed (if so desired). The creation of questions is a 4 part affair:
- First you enter the question, I've found that its worth setting a consistent form to your questions, i.e. if you start of numbering them make sure you remember to continue this numbering throughout (including the format of numbering 1) or 1. or 1- etc) and likewise be consistent with how you end these questions I found I was constantly swopping between : and ?'s.
- Next you have to enter what type of answer you require there's a long list to go through I'm no professional of what each section is but I'll try to explain to the best of my ability:
- Single Line of Text - best used for single word answers or phrases, you get the added option of limiting how many characters the user can type in.
- Multiple Lines of Text - if your asking for specific feedback about a question or asking for comments, you also get the option to limit the number of lines displayed in the box (i.e. the box's size) however if exceeded the box will start scrolling. (its wise to only use the Multiple line option if you know the user is going to type a lot in there the less used the better as it'll maintain a snappy survey for both the user and the computer).
- Choice (menu to choose from) here you get to create your very own multiple choice question, similar to the choose your nationality question so many online application forms ask.
- Number (you can set a max and min number if so desired).
- Currency
- Date & Time
- Lookup (information already on this site) I don't quite get this type of answer, you get the option to select which area of the site you want to lookup and then the user can select that option, i.e. if you got it to look at modified site content you'd be given a list of modified site content to choose from the only way I could see that this might be useful is if you wanted students to choose their favourite document or something similar and equally as boring as that!
- Yes/No (check box) - you don't get the choice between choosing yes or no you get the choice of choosing yes or leaving it blank (doesn't quite look right so I end up creating a Yes and No option in the Choice answer option.
- Person or Group - your answer will be a person or a group on your site could be useful if you've doing per assessments... particularly if your doing online per assessments and have set groups into anonymous groups users could select the group which they think is best/worse etc.
- External Data - I have no idea what this option is since its not fully functional due to the system not being set up to allow it. (just pretend it doesn't exist).
- Page Separator - this tool is actually the most useful tool on this list as it allows you to group your questions the end result is a page approach to the survey so users don't feel initially bombarded with questions.
- Managed Metadata... ok don't quite know what this does either.. shall add to these two when I've got some time to look into them some more!
- The 3rd option... wow that's quite a long list up there! anyway the last option is you get to customise your chosen type of answer i.e. you can add the extra options if your using a multiple choice question or how many characters you want to use on a Single line answer etc.
- Last but not least you also get to use the very powerful tool of "Branching Logic" this being "if answered yes to above skip to question x", but you can do this with all range of answers from yes or no to multiple choice etc.
- So when you've gone through all your questions you'll probably want to check out an overview of them to check you've included them all and if you need to reorder or edit any of them etc. This can be done by going to the list of surveys you have for your site, click on the survey in question.
- Within here you can participated in the survey by clicking on "Respond to this Survey" button or edit and change the settings of the survey:

Click settings - survey settings - Survey Settings - allow you to edit any of the questions by clicking on them, from this overview page your able to see how the layout of your survey looks, a system which I've done is that if you've implemented the "page separator' feature make sure that you explain what page your on in the next question (page 1 of 10 etc). At the bottom of the page you can click "Add a question" to get to the add question menu again, and change order of the questions does as it says on the tin. You're also able to save the survey as a template, which is particularly useful if you've made a generic survey for a range of modules/programmes.
Oooh one last thing viewing responses that can be found on the image above just after clicking on your survey of choice "Show Graphical Summary of Responses" and "Show all responses" that's all that gets displayed on a non internet explorer computer, if your using windows and have Excel installed you get the choice to download data to an Excel format for post analysis! FUN TIMES!
I might add to this post in time once I've had more of a play about, but hope its been of some use!
Friday, 24 September 2010
Setting Permissions on individual pages/sites in Tulip/SharePoint 2010
| well I did warn you! |
Getting to the Permissions for your Page
1) So go to the site or page your wanting to have unique permissions, and from the Ribbon Menu™ select "Page".
2) From the resulting contextual menu select "Page Permissions" roughly just below where you clicked "Page".
Your then get greeted with a really scary looking page... but don't worry here's a picture of a cat to make it look nicer!
Altering a groups Permissions
Ok I think I'll quit with the cat pictures now they're getting in the way! Anyway so back to this task the default setup for your SharePoint pages is that they'll inherit permissions directly from their parent. Which is quite self explanatory you change the main site's permissions it'll change the sub site's permissions. We want this to stop since we don't want to make it unique! So:
3) Click on the "Stop Inheriting Permissions" icon:
You'll get a warning saying bla bla bla click OK! Unless you genuinely accidentally clicked on the "stop inheriting permissions" button in which case why are you reading this tutorial... however if your just experimenting don't worry as you can re inherit permissions back again if you change your mind!
From here you can alter the different groups permissions, for this example if you wanted to edit the students group you tick the box next to students and in doing so will enable the "Edit User Permissions" icon in the "Ribbon Menu" click this icon and it'll bring up a menu you might recognise from SharePoint 2007:
I won't go into explaining all these different tick box's as they're quite self explanatory, you need to have at least one ticked so alter these to your hearts content... Once happy click "OK" and your done.
Removing a group from your Site/Page
If your not wanting your group to have any permissions on your site you can't just un-tick these items you have to actually remove the group from your site. So to do this go back to the "Permissions Tool" page by cancelling this pop up or repeating this tutorial up till step 2.
When your at the list of groups/users tick the little box next to the group your aiming to remove and click on the "Remove User Permissions" icon which'll be enabled, ok the warning and your done.
Adding changing an individuals permissions for your site
However if your wanting to enable individual students/staff to alter a document/page/library we need to go back to the "Permissions Tools" page (the page we got to from step 2 up above). When here click the "Grant Permissions" icon.
When you click this a pop up window will appear which might look a bit scary to start with but is actually quite simple. The top box is where you add the different staff/student names. If you know their full name as listed on the system type it in here separated by a semi colon ooor even easier search for their names using the address book as shown in my 5 steps to glory image:
If your unable to view that image it goes like this:
- Click the address book icon
- Type name into the search bar
- Click on the right name
- Click add
- Click ok
Friday, 17 September 2010
Explorer View in SharePoint 2010?
However the new version of SharePoint 2010 (updated Tulip) doesn't have this feature as prominent which is both a good and bad thing, bad because if your used to creating backups via this means then at first glance it seems to not be there. But good in the aspect that Microsoft are aiming their system at all users not just Microsoft Windows users, so all you Linux and that other fruit based operating system users can get a piece of the SharePoint love!
So How do I get to View my files in Explore View?
Simple! I'm going to make the assumption your using a Windows Based computer and are using Internet Explorer, if not then please do as this wont work otherwise. Go to the document library your wanting to view (for this example I'm using my SharePoint based E-Portfolio system for Midwifery Students):
You should see the magical ribbon listed along the top... you know the standard ribbon which Microsoft seem to think everyone's familiar with and love... obviously I'm very familiar with it and indeed do love it... in all fairness at least they've chosen an idea and gone with it.... much like this. Ok in this ribbon you should see "Library Tools" Select sub heading "Library" (as marked in the above image).
This will change the ribbon to the following image from it about in the middle of the page you shoudl see "Current View:" with a drop down menu underneath. From the drop down menu select "Explorer View".
You'll have to wait for a bit as it does its thing, I'd imagine there's a fair amount of authentication involved in this task hence the delay anyway as if by magic your documents will view in Explorer View:
I've not tested this at home yet (as my home laptop is run by fruit) but it works on my works computer which is running Windows 7 and is on the Uni network so it might not work if your on XP or Vista (please let me know if it does).
Monday, 19 July 2010
How to upload files in the new version of Tulip/MySites/SharePoint2010?
Right so how do I upload?
- Log into the portal like you would normally
- Go to the site your wanting to upload a file to (for this example I'm using a subsite of my MySite).
- Within said site go to a document library all Teaching and Learning sites have a "Shared Documents" folder by default so go to there. For my example I'm going to use the "Case-Loading" folder in my Eportfolio subsite.
- Within your document library you should see something similar to this:
- As noted select the "Documents" link at the top which should change the "Ribbon" to have contextual information which will hopefully be quite self explanatory:
- From this select "Upload Document" and the following should pop up:
- It should be quite self explanatory what to do next particularity if you've ever uploaded anything on the internet before, in case your mind fails you select "browse" and find the file your aiming to upload.
- It'll take a couple seconds to upload (depending upon your internet connection). You will then be greeted with a quick edit panel (I'm assuming this'll get removed in the not to distant future)
you'll need to fill out all fields marked with an *, once done select "Save" and your done.
Hope this is of some help to you, please comment or email me if you need any points explained etc.
Incase you've missed it my Video tutorial can be found here:
Wednesday, 3 February 2010
Flaky webcasts?!
However it does seem that a number of students are having issues when using internet explorer that they keep on getting an error message and kicking them from the broadcast. This is an issue our end but in the mean time please follow this guide to bypass the problem.
The Steve Hodge 5 steps to happiness whilst viewing a web cast:
The cause of these issues are apparently down to issues with chat room feature, so the best solution is to simply bypass using the chat room and view the web cast directly in a media player.
- If your on a windows based computer open "Windows Media Player" look for an icon similar to this:
- If this is the first time you've opened Windows Media Player it'll take you through a load of setting up steps, do as they say or cancel it (doesn't make any difference to viewing the webcast). Once its all loaded up fully go to the file menu at the top, if this isn't viewable press the "alt" button on your keyboard.
- From the file menu select open url:

- This should bring up a pop up box like this:

in this box the address you paste in is different depending upon where the broadcast is origin from:- Plymouth - Main campus: http://video.plymouth.ac.uk/webcast2
- Plymouth - PAHC: http://video.plymouth.ac.uk/webcast1
- Taunton: http://video.plymouth.ac.uk/webcast4
- Truro: http://video.plymouth.ac.uk/webcast3
- Click ok and it should start streaming your desired web cast.
Then try one of the other links as you might well be on the wrong channel. Its worth noting that you can try this out any time prior to your web cast being aired as the system will still return something, so worth checking to make sure it still works etc!
Friday, 27 November 2009
Using your SharePoint/Tulip blog like you wish you could... or can do on Blogspot...
The aim of this tutorial is to give you a brief overview of how to use Tulips blogging tool and how to make it at least behave like a real blog should.
Hopefully once you’ve completed this tutorial you’ll be able to:
- Find your blog
- Create a Blog Post
- Edit your post Add images to your post
- Delete a blog post
- Re-finding your deleted blog post
- Create category’s
- Save as Draft and other such delights
When Microsoft created SharePoint they’d heard of the concept of Blogs but hadn’t actually used one! This is a tad frustrating for those of us who have used alternatives and for subjects of a non confidential nature I’d suggest using Blogspot or similar, however things where confidentiality is a high priority I’d suggest keeping them within the warm walls of a VLE. This way if you were to accidently say, I saw [insert name here] in the surgery today the damage is going to be limited. It also means you get to read my amazing tutorials!
This tutorial is aimed at University of Plymouth students on the Integrated Practice SCW539 module however it can be applied to anyone using the blog tool on SharePoint.
Let’s find your blog!
Having looked at all your blogs it’s obvious the majority of you have managed to find your correct blog however for those of you who haven’t looked yet are looking so hard you’ve magically made it disappear your blogs can be found on your “Integrated Practice II” module site.
Within this page I’ve created a list of all your blogs so not only can you find your own but you can also spy on your fellow comrades blogs. This list can be found on the left hand menu under sub heading “Lists” and titled “Blogs”.
This’ll bring up a list of names one of which should be your own....
Create a Blog Post
Let’s go to the main page of your blog, for this example I shall be using Tara Alexander’s blog, (I haven’t asked for Tara’s permission so shhh!!). On the right of the main page you should see a title of “Admin Links” one of the bullet points underneath should say “Create a post”, click this.
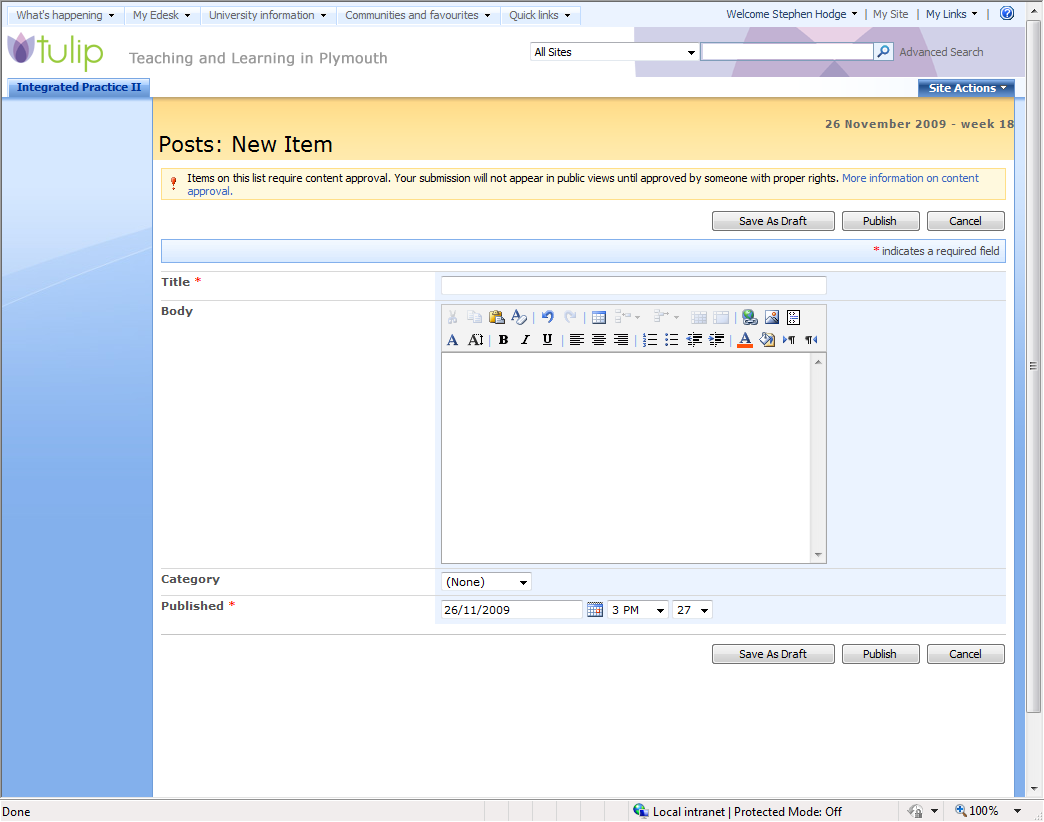
We are then taken through to the Post: New Item page, this will display in two different ways depending upon which browser you are using. If you are using Internet explorer it should display like this:
Or if you’re using any other browser like this:
Here we see the Microsoft Monopoly in full force, i.e. if your using internet explorer you get better functionality than if you use its competition bah! So I’d suggest using Internet Explorer for your blog if you can. Since this enables you access to the format pallet. However if you’re using a Mac, Linux or are just plan stubborn I shall give you some help on simple formatting.
Anyway for simple tasks this page should be quite self explanatory, so go ahead and type anything in there. Before you submit, take some time to appreciate the “Category” and “Published” sections. This can be quite useful if you want to spoof when your posts are made or if your posting about something in the past. The Category section is a useful thing to get into using since it’ll allow you to organise your posts and filter them via Category, for example if you were blogging about animals and created a separate Category for Cats and one for Dogs you could filter by Dogs and just list all your Dog posts....
Once your happy with what you’ve done here press the “Publish” button, you can press the “Save as Draft” button but we will cover this in another section.
Well-done you have made your first blog post! The internet can occasionally be quite flaky sometimes bad things happen to blog posts when you press the send button I suggest prior to posting you save all what you’ve written into a Word document, just to be on the save side, it’ll also spell check it for you!
Edit your Post
Right so I have posted a next to useless post onto Tara’s blog, let’s make it say something a little bit more useful! First lets go back to the home page of your blog. Under the Admin Links (where we found create post) there should be a link titled “Manage Posts”:
Click this. You should then see a list of your blog posts. If you hover your mouse over the blog post your wishing to edit a orange highlighting box should appear around the title followed with a small box to the right with an arrow left click this arrow and a sub menu should appear:
From this sub menu select “Edit Item”.
You will then be brought back to the Post edit screen we saw from the earlier step... magic!
Adding Images to your Post
Adding images to your posts... well this is the money post. The two warm up acts have exited the stage left and the crowed is cheering for the headliners to come on stage... adding images on to your Tulip blog is a simple dance move... the “Two Step”.
- upload your image
- attach said image to your post
Step1 – Uploading your image
- If you go to your blog you should see a link on the left of the page titled “Photos” click on this.
- Once in this page along the top bar there should be a link titled “Upload”, click this.
- It should bring up a simple upload screen (much like on facebook, Flickr etc). Click on browse and find the image you wish to upload, once you’ve found it click “Open”.
- The once empty box next to the Browse button should now be full of text as shown below. Before we click on, you should note the “Overwrite Existing files” tick box, this simply means it’ll overwrite any images with the same file name... this can be both useful (if making alterations) or very annoying if something is simply shares the same name! Once your done click “ok”.
- It’ll take some time to upload the image, depending upon your internet connection. Once done you’ll then be taken to the properties page, here you have to fill out all the feilds maked with an *, so Title, Name, Subject, and Keywords... sorry this is a bit of a hassle but otherwise it won’t work properly! Once these have been filled out scroll to the bottom and click “Check In”.
- Once this is done you’ll be taken back to the page we started with in step 2, you should hopefully have successfully uploaded your image, now we want its address so we can link to it in our blog...
- Click this said image’s name and it should bring up your image.
- Right click your image and select properties.
- This’ll bring up a nice list of information we want the one which says Address (URL): it should start with HTTP, select it all it should start with HTTP and end with JPG. (note you can do this with any image on the internet so you don’t necessarily have to have uploaded it first!), once you have selected it right click and copy.
- You now have your image’s url copied into your clip board.
Step2 – Attach said image to your post
This step will hopefully be a little bit simpler! There are two methods to do this depending upon which web browser you use if you haven’t got a clue what web browser your using then you’re probably using Internet Explorer.
Internet Explorer Method
- Go to a post you want to edit or create a new post.
- From the edit pallet select the Insert Image button (square icon with mountain and sun).
- This will bring up a pop up box where you fill out the “Alternative Text”, this text gives the image some context if images can’t be shown or for visually impaired readers of your blog. In the Address section paste your image url. Finish by clicking ok.
- This’ll then magically import a image into your post, sometimes your image might be waaaay to big, so use the image resize tabs to drag the image smaller.
- And your done!
Non Internet Explorer Method (Firefox, Chrome, Safari etc)
- Go to a post you want to edit or create a new post.
- In the body section, you are going to add some HTML code which embeds an image; this is much like adding images etc like in the days of MySpace! Simply paste the following in the body replacing the words yourimageurl with the url you got from the first step.
<img src="URL" width="400" />
Note. You can change the value in the width section to change the width, although 400 is about ideal.
- Once you have added this press “publish” and you are done!
Delete a blog post
Sometimes you might have just written utter rubbish on your Blog or you want to delete all your “Test posts”. Well this is actually quite an easy task to do.
- Go to your blogs main page, and select “Manage Posts” from the “Admin Links” section on the right of the page.
- This will bring up all your blog posts, move your mouse over to the post your wanting to delete. It should highlight the post with a yellow box, to the right of which is an arrow:
- Clicking this arrow brings up a menu, from this menu select delete, it’ll then ask you if your sure... are you? If you are then click ok!
- And we’re done!
Re-finding your deleted blog post
So you’ve successfully deleted... the wrong post DOH! Don’t worry provided you’ve realised this fact within 30 days you should be able to retrieve it from the recycle bin!
- Go to your blogs main page (or any page of your blog).
- Left hand menu last link you should see in green writing “Recycle Bin” click this.
- Tick the box to the left of the post you want to restore then click the “Restore Selection” button it’ll typically ask you if your sure... because you’d defiantly accidently go to your recycle bin tick a box and then press restore selection. And your done!
Create category’s
Category’s are quite useful things, they allow you to give some context to your blog posts, your are initially given 3 well thought out category’s of Category 1, 2 and 3 I’d suggest you create you own! To do this:
- Go to your blogs home page
- On the left hand menu you should see a heading of “Categories” under which listed you should see a link titled “Add new Category”
- Fill out the title field and click ok and your done.
Some final notes
If you save for drafts you can go to your “Manage Posts” link from the home page. Bring up its sub menu and select “Approve/Reject”. This will then bring you to Approve/Reject/Pending screen select one of these and click ok.
For those of you not using Internet Explorer you can enter some simple html code into your blog posts the simplest ones are as follows:
- <strong>Bold</strong> BOLD
- <br /> Line break
- <p>a paragraph</p> put the <p> at the start and the </p> at the end of a paragraph
<h1></h1>
<h2></h2>
<h3></h3>
- <a href="http://bbc.co.uk">Link></a> Link
Well hope this hasn’t been to complicated for you all please leave comments or email me if you need anything cleared up?!
Tuesday, 20 October 2009
Discussion Board User
1. Go to the Module/Programme site in question, and select the discussion board your wanting to let your students use:

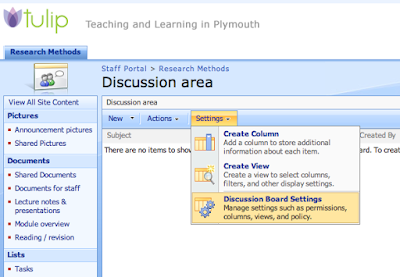
2. Once in the correct Discussion area press the "Setting" button, this brings up a sub menu (as pictured), from this menu select "Discussion Board Settings".

3. You are then greeted by a scary looking page full of settings, don't worry take some time in reading each section if you want there are some useful settings you might want to come back to at a later date to change. However for this example we just want to change the permissions so select the link called "Permissions for this discussion board". (as shown below).

4. Tulip then shows you all the different permissions associated with that particular discussion board (I bet you wern't aware there was so many). There's not much else you can do on this page apart from select "Actions" from the Menu and then "Edit Permissions". Tulip will then warn you that you are going to change the permissions of this section and not the whole site.. or something along those lines, don't worry about what it says just click ok and move onto the next step!
If you or a colleague has already changed the permissions on your module site then this whole step will need not apply (it'll be obvious if so since this step wont make sense! Just skip this step and move onto step 5.5. You will then be greeted with the same list only this time each user group has a little tick box to the left of it. We are wanting to change the Students group so tick the little box next to them (as shown below). Once you have ticked the right box select "Actions" from the top menu and "Edit User Permissions"

6. This brings up a list of all the permission levels you can possibly give a user, we could give the students "Full Control" but this might have repercussions as they'd be able to delete fellow students replies or edit them etc, luckily the nice chaps in Babbage (I think) have created a specific permissions group for discussion boards titled "Discussion Board User", tick the little tick box and press ok. (As shown in the image below)
7. And your done, if done correctly you should see your students group with "Read, Discussion Board User" next to it, as shown below.